4/7/17
Geocoding
Background and Objectives:
As a section of the multi-part sand mine suitability/risk model project, this part of the project will continue to focus on sand mining in Wisconsin. Trempealeau County will continue to be a focal area of the project. However, in this section of the project the study area was expanded to other areas in Western Wisconsin. The primary objective of this section is to geocode sand mine addresses with the use of a normalized data table. Sand mine location data was provided by the Wisconsin DNR, however, the data had to be normalized before they could be used for geocoding.
The overall objectives for the lab are as follows:
- Normalize the mines MS Excel table.
- Connect to the geocoding service from ESRI and geocode the assigned mines.
- Connect to the departmnt ArcGIS server and add the Public Land Survey System (PLSS) feature class.
- Manually locate the assigned sand mine locations using either their address or PLSS location.
- Compare results with the actual sand mine locations as well as with other colleagues results.
Methods:
To begin the sand mine location data table that was provided had to be normalized. The original data table contained several errors that had to be corrected before geocoding could take place (Figure 1). Spaces in the titles had to be removed and certain information such as addresses as well as PLSS locations had to be separated so they were alone (Figure 2).
Figure 2. Normalized data table with address and PLSS information separated.
Next, the sand mine locations were geocoded. This was performed by logging into the enterprise ArcGIS Online Account in ArcMap. The normalized data table that was added into ArcMap was used to geocode, and was selected in the geocode addresses module. After the geocoding tool was ran the address inspector was viewed. Each candidate was viewed individually to see if the mine was indeed in the position that the geocoding results said it was in. Mines that were in the wrong location were manually re positioned using the pick address from map function. Some maps did not have an address provided. For these situations the PLSS location was used to determine were the actual mine location was. In other instances the address that was provided was not were the actual sand mine was. The mine location was set were the drive way met the road way for analysis purposes.
After the sand mines were georeferenced the results were compared to the actual locations of the sand mines. The actual locations were provided by the DNR. Results were also compared with other people in the class that were assigned the same mines. To acquire the information about the distance between the geocoded mine locations, the actual mine locations, and class mine locations, two selections were first performed. The selections were done to select for the mines that were assigned so that a direct comparison could take place (Figure 3). Mines were selected by using the Unique_ID field.
Figure 3. Selection tool.
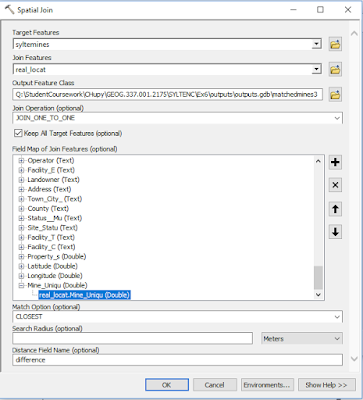
After the correct mines were selected two spatial joins were performed to acquire the distance information (Figure 4). One join was performed between the geocoded mine locations and the actual mine locations. The other spatial join was performed between the geocoded mine locations and the class mine locations. To allow for the correct distance units to be used, the sand mine location data had to be projected into the NAD_1983_Wisconsin_TM (meters) coordinate system.
Figure 4. Example of one of the spatial joins.
Following the spatial joins the difference in distance between the mine locations was viewed and then transferred to an Excel spreadsheet for analysis. A map of the mine locations was also generated.
Results/Discussion:
The primary objective of the lab was to accurately geocode the sand mine locations. Below is a table showing distance between the mine locations (Figure 5). The average distance between my mine locations and the actual locations was around 3000 meters. This is much smaller compared to the distance between my mine locations and the locations of the class mines. The indication of this result is that I was more accurate in placing mine locations than the others in the class who shared the same mines.
Figure 6 displays were I put the sand mine locations compared to the actual locations. A great majority of the locations were correct. However, two locations in Barron County and one location in Jackson County were incorrect. The reason for this is that there was no mine located were the PLSS data said the mine was supposed to be. The DNR website was used to place these three mine locations which turned out not to be the actual locations. A likely possibility is that these mines are no longer active. The locations on the DNR website may have just been active mines owned by the same company.
A reason for the large distance (3000 meters) between were I placed the mine locations and the actual mine locations has to do with were I placed the address. The address was placed were the driveway met the main road, whereas, the DNR placed the mine location directly on top of the mine itself. This would account for a good portion of the error.
Figure 6. Map displaying geocoded mine locations compared to the actual mine locations as provided by the WIDNR.
Conclusion:
Overall, the lab was very effective in teaching how to geocode. Geocoding is an important skill to posses and should prove useful in the future. In the future, making sure every location is exactly were it should be will be the primary focus. The lab was also very helpful because required the data to be normalized. Normalizing data is often overlooked even though it is extremely important. If ones data is not normalized then it cannot be used in ArcMap.


No comments:
Post a Comment